

Introduction: Rainwater Drip Irrigation System

Here's a simple drip irrigation system that uses gravity to put rain water from a rain barrel exactly where it's needed in the vegetable garden. This dripper is designed for a square foot garden system, but can be used in any garden situation.
Drip irrigation is very efficient. Water is put exactly where it's needed-at the root system of the plants. No water is wasted due to runoff or evaporation.
This is my entry for the Get in the Garden contest. I hope you like it!
Step 1: Dripper Materials

This project is constructed out of 1/2" PVC. Here's what you'll need:
4 4" long pieces of 1/2" PVC
2 36" long pieces of 1/2" PVC
2 90 degree elbows for 1/2" PVC
1 four way connector for 1/2" PVC (a tee connector could be used here)
1 female hose connector for 1/2" PVC
1 male connector for 1/2" PVC (if a tee connector is used, this isn't needed)
2 end caps for 1/2" PVC
1 drill
1 1/16" drill bit
1 hacksaw
PVC primer
PVC glue
tape measure
Sharpie
Step 2: Mark and Drill Drip Holes


Mark the two 36" long pieces of PVC for the drip holes. The holes are 1" apart.
Once the hole locations are marked, drill 1/16" holes at each mark. Please note that the holes ONLY GO THROUGH ONE SIDE OF THE PIPE. DO NOT DRILL THROUGH BOTH SIDES OF THE PIPE!
Step 3: Glue on the Elbows

Now's the time to glue on the elbows.
First, prime both the ends of the drip pipe and the inside of the elbows. The primer I'm using is purple. You can also get clear...
Once both pieces have been primed, apply glue on the end of the pipe, the put the elbow on.
Remember that the holes will be on the bottom of the dripper, so the elbows need to be put on to allow this...
Step 4: Connect the Drip Pipes
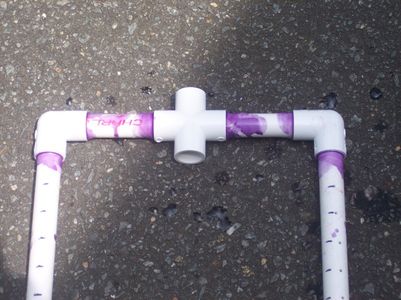
First, glue two of the 4" pieces to the elbows, using the same procedure of primer and glue as described in the previous step.
Then glue the two sides to the four way connector.
Step 5: Water In, Water Out

Now we'll glue on a way for water to get into the dripper, and a way to let water out (maybe to link to a second dripper...)
Glue the other 4" pieces onto the four way connector. Then add the male connector to the side between the drip pipes, and the female connector to the side that will be sticking out. The garden hose is connected to the female connector.
I realize that's kinda confusing...check the picture for clarification.
Step 6: Cap the Ends
You're almost done. Glue the two end caps onto the open ends of the drip pipes.
Step 7: Time to Water the Plants!

The dripper is installed on either side of the plants to be watered, with the holes on the bottom. Connect the hose to your rain barrel (as long as the rain barrel is higher than the garden) and open the valve...you're plants will thank you!
Participated in the
Get in the Garden Contest


